Serviços Personalizados
Journal
Artigo
Indicadores
-
 Citado por SciELO
 -
 Acessos
Links relacionados
-
 Similares em
SciELO
Compartilhar
Ciência & Tecnologia dos Materiais
versão impressa ISSN 0870-8312
C.Tecn. Mat. v.22 n.1-2 Lisboa jun. 2010
DIA MUNDIAL DOS MATERIAIS 2009
2ª Menção Honrosa ORDEM DOS ENGENHEIROS
Cold Spray Deposition of Titanium onto Aluminium Alloys
M. Barbosa(1) *, N. Cinca(2), S. Dosta(2), J. M. Guillemany(2)
(1) Departament of Metallurgical and Materials Engineering, Faculty of Engineering, University of Porto, Rua Dr. Roberto Frias, 4200-465 Porto, Portugal;
(2) Thermal Spray Centre (CPT). Dpt. Ciència dels Materials i Enginyeria Metallúrgica. Universitat de Barcelona Martí i Franques 1, E-08028, Barcelona, Spain.
ABSTRACT
The aluminium alloy 7075-T6 is widely used in aeronautic engineering due to its high mechanical resistance to weight ratio. Depending upon the environmental conditions, many types of corrosion mechanisms have been found to occur in aircraft structural aluminium alloys. A possible solution to improve the alloys behaviour is the deposition of a pure Titanium coating. At present the deposition of Titanium is limited to processes such as Electroplating, Chemical Vapour Deposition and Vacuum Plasma Spray. These traditional approaches are generally slow and expensive, while the common thermal spray processes have two major limitations which are the presence of porosity and oxides in the spray-deposited material. Since Titanium is a metal very sensitive to oxidation, it is proposed in the present work to deposit it onto Aluminium substrates by a novel thermal spray process known as Cold Spray. In this work, the influence of the gas pressure and temperature, and the powder feeding rate on the cold spray process and in the final coating characteristics was studied, and a dense pure titanium coating onto aluminium 7075 substrates, with thickness higher than 300µm and no microstructural changes was easily and fast obtained. It was possible to conclude that after optimization, the cold spray process when compared to the conventional thermal spray techniques, results in coatings with very good properties and cost-time effective (higher coating thickness can be achieved in less time and with less money investment), making it ideal for industrial applications.
Keywords: Aluminium, Titanium, Cold Spray, Factorial Analysis.
RESUMO
A liga de alumínio 7075-T6 é amplamente utilizada na aeronáutica devido à sua elevada relação resistência mecânica/peso. Porém está sujeita a diversas formas de corrosão resultantes dos diferentes ambientes em que se encontra inserida. Uma possível solução para melhorar o comportamento desta liga em situações de corrosão é o seu revestimento com uma camada de titânio puro. Porém, uma vez que o titânio é um metal extremamente sensível à oxidação, a sua deposição no estado puro encontra-se limitada a processos como a Electrodeposição, Chemical Vapour Deposition ou Vacuum Plasma Spray, que são técnicas lentas e dispendiosas. Este trabalho propõe a deposição deste metal num substrato de alumínio 7075 através de uma tecnologia inovadora de deposição a frio conhecida como Cold Spray. A influência de diferentes parâmetros de deposição é estudada (temperatura e pressão do gás de processo, velocidade de alimentação do pó) e foi possível obter um revestimento de titânio puro superior a 300µm, de forma rápida e fácil, sem quaisquer alterações microestruturais. Após optimização dos parâmetros de deposição, o processo de Cold Spray, quando comparado às técnicas de projecção térmica convencional, permite obter revestimentos com boas propriedades mecânicas de forma rápida e económica, tornando-o ideal para aplicações industriais.
Palavras chave: Alumínio, Titânio, Cold Spray, Análise Factorial.
1. Introduction
The aluminium alloy 7075-T6 is widely used in aeronautic engineering due to its high mechanical resistance to weight ratio. Depending upon the environmental conditions, many types of corrosion mechanisms have been found to occur in aircraft structural aluminium alloys. A possible solution to improve the alloys behaviour is the deposition of a pure Titanium coating; apart from the amelioration of its performance against aggressive environments, titanium also offers many other advantages such as weight savings, replacement costs and life cycle cost benefits. At present the deposition of Titanium is limited to processes such as Electroplating, Chemical Vapour Deposition and Vacuum Plasma Spray (VPS). These traditional approaches are generally slow and expensive, while the common thermal spray processes have two major limitations which are the presence of porosity and oxides in the spray-deposited material. Within the thermal spray area, VPS has been the only technique used, up to now, for titanium deposition, usually in biomedical applications. Such process has, however, one main limitation which is the high investment costs: expensive vacuum pumps and chambers of considerable dimensions are required to generate and maintain the low-pressure environment required for plasma treatment of workpieces [1]. A promising alternative regarding its lower cost-effectivity and able to avoid titanium reaction with oxygen is the use of the Cold Gas Spray technology.
Cold Spray is the name of the process in which powder particles, ranging from 5 to 100µm, are accelerated by injection into a high-velocity stream of gas and then impinged upon suitable substrates. The expansion of a pressurized, pre-heated gas through a converging-diverging nozzle is the reason why the powder particles can impact the substrate with a velocity ranging between 300 and 1200 m/s, deforming and, consequently, bonding to it. The successive particles impacts result in a uniform coating with very little porosity and high bond strength. The term cold spray has been used due to the relatively low temperatures of the expanded gas stream that exits the nozzle, and consequently the temperature of the particulate material remains below its melting point and therefore the resultant coating is formed in the solid state.
Cold Spray offers many advantages but there are still some limitations inherent to the process itself. Being a rather recent technology, no large-scale commercial applications have yet established themselves in the broader thermal-spray marketplace. The state-of-the-art is rapidly changing and, within the last years few authors have reported their investigations dealing either with the influence of some of the spraying parameters on the deposition efficiency or the understanding of the bonding process [2, 3, 4, 5]. While in conventional Thermal Spraying processes, mechanical bonding is more likely to occur when particles melt and rapidly solidify, at the moment, the most accepted theory for Cold Spraying is the assumption of the existence of the so-called adiabatic shear instabilities, which means that, at high particle velocities, there is a thermal softening locally dominant over strain and strain-rate hardening, which promotes an intimate contact between incoming particles and substrate. This theory holds at high temperature and pressure. It also explains the transition from erosion to cold spray adhesion, the behaviour of powder deposition efficiency and the existence of an incubation time [6].
Much fewer are addressed to properties evaluation such as corrosion [7] or mechanical performance [8]. As far as corrosion resistance is concerned, Wang et al., proved that the denser the coating is, the lower is the corrosion current [7], whereas regarding mechanical properties, Price et al., for example, in the attempt to evaluate the fatigue resistance of Ti-CGS deposits for biomedical purposes, found that those made the fatigue limit of Ti6Al4V substrates decrease, probably attributed to the occurrence of induced tensile residual stresses [8]. Therefore, it is a challenging issue and there is still a long way to go.
The present paper is intended to optimize the cold spray process in order to obtain a fully dense titanium coating into a 7075-T6 aluminium alloy. The influence of spraying conditions by modification of temperature and gas pressure, as well as feeding rates and particle distribution, has been assessed.
Cold Spray
Cold spray as a coating technology was initially developed in the mid-1980s, by Anatolii Papyrin et al while studying models subjected to a supersonic two-phase flow (gas + solid particles) in a wind tunnel [9]. These Russian scientists successfully deposited a wide range of pure metals, metallic alloys, polymers and composites onto a variety of substrate materials.
There is a very basic difference between the conventional techniques and the cold spray process. While in the first ones the device requires both thermal and kinetic energy for the coating formation, in cold spray only kinetic energy is used, although in many aspects, a generic cold spray gun (Fig. 1) looks very similar to some of the traditional thermal spray devices described earlier.
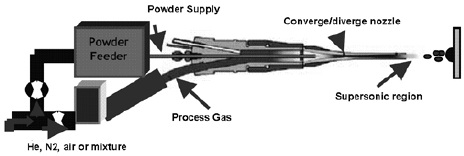
Fig. 1 - Schematic diagram of a cold spray gun [6].
Pressurized gas (generally air, nitrogen or helium) is heated, usually with electrical energy, to temperatures generally in the range of 300-800°C and then passed to a converging-diverging nozzle to create a supersonic gas jet. However, unlike conventional thermal spray processes, the reason to heat the process gas is not to melt the spray material. The gas is heated to increase its velocity to supersonic values, while passing the converging-diverging nozzle [6, 9-15]. The supersonic velocity is reached due to the change of the Mach number (M=v/vs, where v is the gas velocity and vs the sound velocity) along the nozzle. Since the gas expansion is followed by a temperature decrease, which can in some cases even be below room temperature, the process got the name of Cold Spray. Figure 2 shows a comparison of approximate process temperature and particle velocity ranges for cold spray and conventional thermal spray processes [9]. Analysing the image, it is clear that cold spray occupies a unique position, offering exceptional low process temperatures combined with high particle velocities.
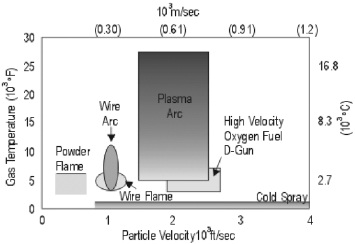
Fig. 2 - Comparison of approximate process temperature and particle velocity ranges for several common thermal spray processes and cold spray [9].
The process uses powder feedstock, in the range of 5-50µm in diameter, that is then injected in the central axis of the cold spray gun. Since the powder particles are only exposed to the hot process gas for a short period of time, they arrive at the workpiece surface in the solid state, usually far below their melting point. The particles are accelerated to velocities of the order of 5001200m/s before they impact the surface. If that velocity is sufficient for a given particle/substrate pair, the solid particles plastically deform and flow upon impact, creating an hydrodynamic flow instability at the interface between the incoming particle and the underlying material, which results in bonding at the interface [9-15].
Because of its low-temperature operation, the cold spray process generally offers a number of advantages over the thermal-spray material deposition technologies, such as oxy-fuel, detonation gun, plasma, arc sprays, and others. Among these advantages, the most important appear to be: (a) the amount of heat delivered to the coated part is relatively small so that microstructural changes in the substrate material are minimal or nonexistent; (b) due to the absence of in-flight oxidation and other chemical reactions, thermally and oxygen-sensitive depositing materials (e.g. copper or titanium) can be cold sprayed without significant material degradation; (c) nanophase, intermetallic and amorphous materials, which are not amenable to conventional thermal spray processes (due to a major degradation of the depositing material), can be cold sprayed; (d) formation of the embrittling phases is generally avoided; (e) macro- and micro-segregations of the alloying elements during solidification which accompany the conventional thermalspray techniques and can considerably compromise materials properties do not occur during cold spraying. Consequently, attractive properties of the powder material are retained in cold-sprayed bulk materials; (f) peening effect of the impinging solid particles can give rise to potentially beneficial compressive residual stresses in cold-spray deposited materials in contrast to the highly detrimental tensile residual stresses induced by solidification shrinkage accompanying the conventional thermal-spray processes; and (g) cold spray of the materials like copper, solder and polymeric coatings offers exciting new possibilities for cost-effective and environmentally friendly alternatives to the technologies such as electroplating, soldering and painting [7-15].
2. Experimental procedure
As said before, the main goal of this project is to optimize the cold spray process in order to obtain a fully dense titanium coating into a 7075-T6 aluminium alloy. To lead to optimization, the first step is to determine which factors and which interactions between them are important in affecting the response. For that, different process parameters will be varied and then the pair with the highest deposition efficiency will be chosen. Finally, analysing the obtained results, we will try to better understand the mechanisms leading to the bonding formation between the coating and the substrate.
The powder used as feedstock was a microcrystalline Commercial Purity (CP) titanium Grade 1 powder, from GfE (Metalle und Materialien GmbH), obtained by ball milling. The powder particles are very angular and have a very irregular form (Figure 3), which is consistent with the powders fabrication method and, according to some authors, it represents an advantage for the cold spray process since the irregular particles reach higher velocities and have a beneficial contact behaviour by increasing particle/particle interaction during impact [14, 16]. Its particle size distribution shows Gaussian shape within the range of 22-90 microns. Such powder was sprayed onto 7075-T6 aluminium alloy coupons previously degreased and scratched in order to promote better bonding by disrupting the thin oxide layers in the surface and provide intimate contact particle-substrate.
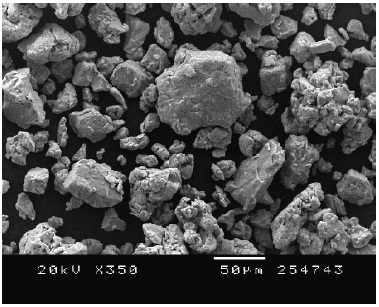
Fig. 3 - Micrograph of powder morphology
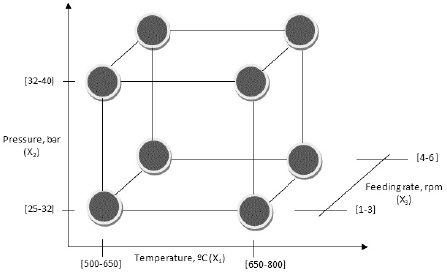
Fig. 4 - Cube representing the experimental domain. At the vertices, are represented the chosen experiments.
The cold spray equipment is a KINETICS®4000 (Cold Gas Technology, Ampfing, Germany), with a maximum operating pressure of 40bar, temperature of 800°C and limited to the use nitrogen as the propellant gas. In addition, KINETICS® 4000 is equipped with a pre-chamber of 120 mm in length connected to the gun nozzle where powders are heated up by the hot gas for a longer time. Regarding the spraying conditions, some parameters such as standoff distance, gun speed and deposition angle were kept constant at 40 mm, 500 mm/s and 90º respectively, based on previous experience.
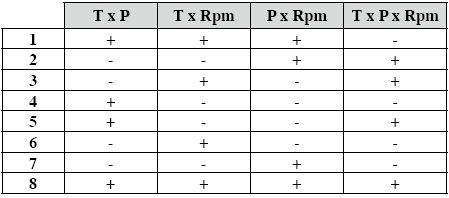
In order to study the effect of pressure, temperature and feed rate, the most convenient methodology was considered to be the realization of a factorial design. This approach ensures the widest information with the lowest number of experiments; when considering an experiment with n variables to be tested, each at two different levels, a total of 2n experiments is required by the factorial design to test every combination. The aim is to assess direct effects of the individual variables and all their possible interactions on a physical quantity. Concerning the present work n=3, this is 23 experiments. The importance of these parameters in the cold spray process was evaluated by measuring the coating thickness, porosity and hardness. In figure 2 a schematic representation of the experiment design can be found and table 1 is a matrix of the experiments. Table 2 shows how to quantify the influence of the parameters interactions in the final result.
Table 1 - Design of experiments: matrix of spraying conditions : *(-)=[500-650]ºC, (+)=[650-800]ºC; **(-) =[25-32] bar, (+)=[32-40] bar, ***(-)=[1-3]rpm, (+)=[4-6]rpm.
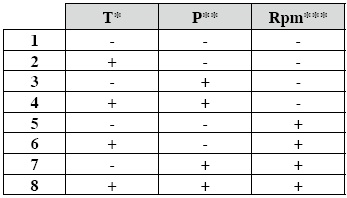
Table 2 - Design of experiments: matrix of interactions.
The examination of the mounted and polished cross sections was performed in a Scanning Electron Microscope (JEOL 5510 microscope) operated at 20 kV and equipped with an Energy Dispersive Spectroscopy (EDS) for microanalysis. The coating microstructure was revealed by etching with Keller´s reagent. The average coating thickness was measured using the SemAfore Scanning Electron Microscope software tool, while porosity was quantified by means of image analysis through the Max Inspector Programme. Finally, microhardness was evaluated by means of a Matsuzawa MTX-a Vickers equipment according to the ASTM E384-99 standard. The mean values result from at least 20 indentations performed in the polished cross-sections of the coatings.
3. Results and discussion
3.1 Coatings Characterization
The coatings obtained with the different combinations of deposition parameters presented before with numbers 1 to 8, are shown in Figure 5 with the respective numeration.
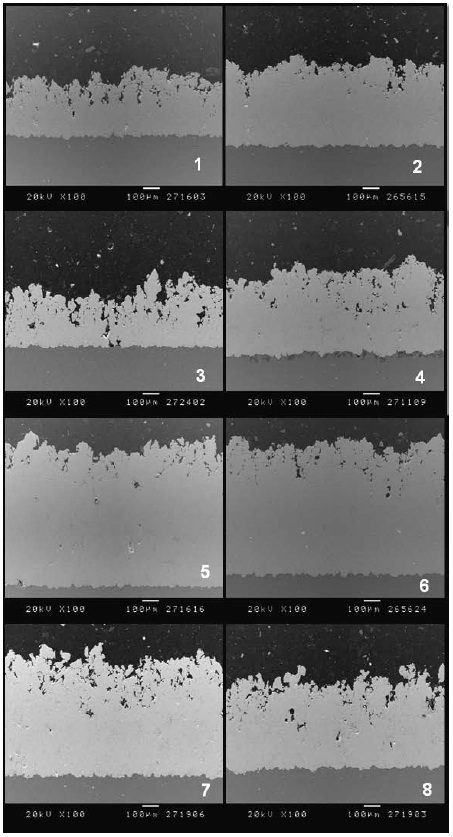
Fig. 5 - SEM micrographs of the titanium coatings obtained with the parameters set from 1 to 8 respectively.
The coatings were characterized according to their thickness (Figure 6), porosity (Figure 7) and hardness (Figure 8).Observing Figure 5, it is possible to distinguish two different zones. In the top region from the surface to the boundary, there are a lot of large pores. On the other hand, in the inner region from the boundary to the substrate the coating has a dense microstructure. It is also possible to observe that the size of the pores decreases with the increase of the depth from the surface towards the boundary. This is due to the peening effect of incoming high-velocity particles which tends to close the small pores and gaps in the underlying material [9, 13, 17].
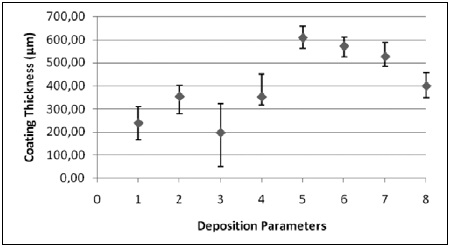
Fig. 6 - Graphic that illustrates the coating thickness obtained for each set of parameters.
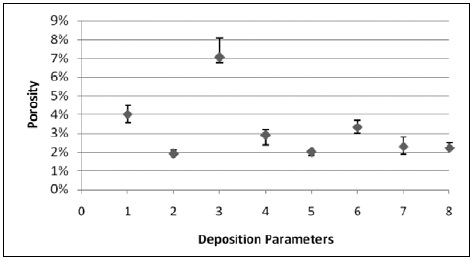
Fig. 7 - Graphic that illustrates the coating porosity obtained for each set of parameters.
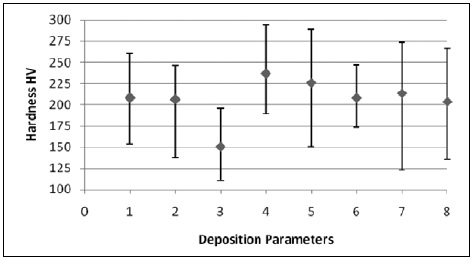
Fig. 8 - Graphic that illustrates the coating hardness obtained for each set of parameters.
From the analysis of Figure 5 and Figure 6, it can be observed that the coating thickness increases with the rising of the powder feeding rate. This was expected since almost the double amount of powder is used in the process. It also increases with the gas temperature for a feeding rate of 1-3rpm because a higher number of particles can reach the critical velocity and consequently bond to the substrate increasing the coating thickness. The same happens when pressure rises. On the other hand, for a feeding rate of 4-6rpm this is not verified maybe due to the accentuated rebound effect cause by the higher amount of particles (nearly the double) impacting the surface, which may interfere with the trajectory of incoming particles preventing them from impacting the substrate, or loose velocity, and consequently not bond, reducing the final coating thickness. The same is verified for a higher pressure.
The porosity level (Figure 7) was measured through the Max Inspector Programme. It is important to notice that not all the voids present in Figure 5, 1 to 8, are pores. Due to the high particle size distribution, in the same coating are present particles with a size of 20μm and particles with size of 100μm, which have a different behaviour during the flight and impact the substrate at different velocities. This results that some particles, which didnt have enough energy to bond to their neighbours and should only cause erosion, get trapped by the arriving particles and incorporate the coating. And when preparing the sample for microstructural analysis, during the polishing operation, these particles get detached leaving a void. This problem may origin results different from the real ones. According to the images, the porosity decreases with the rise of temperature, as expected, since the particles plasticity increases resulting in a denser coating. However, the pressure influences negatively the porosity level since it increases it. The porosity at 25-32bar varies from 2 to 4%, while at 32-40bar it varies from 2 to 7%. It can then be considered that in the highest interval, the particle velocity is so high that the rebound effect increases the porosity (either due to the incoming particle not bonding or due to detaching a poorly attached particle and so the erosion domain is reached). It is though important to refer that this porosity is all concentrated in the top region of the coating, and if this region was later mechanically removed, the coating would be virtually 100% dense[a]. In the case of different feeding rates the obtained results are not comparable since, at higher feeding rate, the coating thickness is much higher decreasing the ratio (porosity area)/(coating area) which is how the programme calculates the porosity.
The hardness was virtually the same for all the coatings (high error range) so the results for the influence of each parameter are not analysed (Fig. 8). It is worth to say that the wide particle size distribution may justify the wide hardness range, since when the indentation is preformed in the centre of a smaller particle the value is higher than in the centre of a bigger particle. Also the particle displacement due to being merely trapped instead of bonded represents an obstacle to a good analysis.
The influence of the parameters on the coating properties can be confirmed by the factorial analysis represented in Table 3.
Table 3 - Quantification of the parameters effect on the coating thickness, porosity and hardness.

Regarding the coating thickness, the parameter with highest effect is the feeding rate since increasing it from 1-3 to 4-6rpm increases it in average 241μm, followed by the temperature which increases it 27μm and finally the pressure, which its increase decreases it 74μm. This values are in accordance in the results expected at the beginning of this experiment, since a pressure increase should result in a denser coating and consequently in a smaller thickness.
The rise of temperature increases the coating thickness for a feeding rate of 1-3rpm, while it decreases it for a feeding rate of 4-6rpm. The interaction of the temperature and the feeding rate is then of big importance. When both the temperature and feeding rate are increased, at a fixed pressure, the coating thickness decreases 108μm. This supports the statement that at high feeding rate and high temperature, the rebound effect overcomes the increase of plasticity and, instead of contributing to the growing of the coating, it causes erosion. The same reasoning can be made for the interaction of the other parameters.
For the porosity, according to the obtained images and, consequently, the factorial analysis, it is once again shown that it increases with the pressure for the previous explained reason. And, as expected, it decreases with the temperature. For the feeding rate the result may be deceiving as said before. The decrease in the porosity by the interaction of the temperature and pressure is due to increase of the particle plasticity overcoming the velocity increase. Finally, the hardness was virtually the same for all the coatings (high error range) so its results should not be considered.
Analysing the coatings structure and their properties it is possible to exclude the coatings number 1, 3, 4, 5, 7 and 8 due to the high amount of pores and to the very irregular surface. It is then possible to state that the best combinations of parameters are number 2 and 6 and their main difference is in the coating thickness. Coating number 2 presents a thickness in the order of 400μm and coating number 6 in the order of 600μm. Comparing these values to the ones obtained by conventional thermal spray techniques, which are in the order of 200μm for higher number of gun passages, it is possible to say that the optimum condition is number 2, since its thickness is more than sufficient to form a protective coating for the required application, and the 600μm of coating 6 become too high making it less economically viable. However, the high thickness that cold spray easily achieves suggests this process as a potential alternative to laser cladding with the advantage of avoiding the heat affected area.
3.2 Further analysis of the selected coating
In order to verify the aluminium/titanium bonding strength and the hardness profile of the area surrounding the interface, a nanoidentation test was preformed in a Nano Indenter® XP system (Systems Corporation). The 75 nanoidentations (matrix of 5x15) were conducted at constant load of 15mN and the results can be seen in Figure 9. The zero value represents the interface zone, and the negative distance corresponds to the substrate while the positive corresponds to the titanium coating.
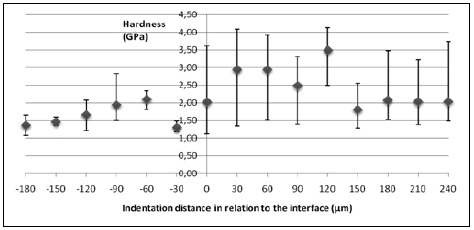
Fig. 9 - Nanoidentation profile obtained for the sample number 2.
The hardness of the aluminium is in agreement with the standard values although it can be seen a slight increase with the approximation to the interface due to the hardening effect introduced by the constant bombing of particles. In the area right next to the interface this value drops due to a small thermal softening of the aluminium, which has low melting temperature, resulting from the high release of energy during the shock of the first particles. The hardness value at the interface is not high enough to allow saying that the bonding is very strong, but it is also not to low since it is in the same order as the aluminium, revealing that the bonding will be good. The hardness for the titanium coating is, as seen before, much higher than the bulk value due to the tamping effect. The hardness decreases with the distance to the interface since the amount of particles impacting on the already bonded ones also decreases, weakening the peening effect.
Also, XRD tests were performed to confirm that there was no reaction between the titanium and the nitrogen/oxygen that confirmed that the obtained coating is of pure titanium.
In order to better understand the bonding process, the TEM analysis of the interface area was also conducted. In Figure 10, A shows the Selected Area Electron Diffraction (SAED) pattern corresponding to interface area represented in B, where one can see the titanium zones, filled by dislocations, mixed with the aluminium areas with their characteristic precipitates. The elemental analysis of different regions indicated a composition gradient of the two elements which indicates that solid-state diffusion as indeed occurred. The presence of an amorphous zone that could indicate a localized fusion, as reported by Xiong et al [18], was not found, which doesnt mean that is not present since it is in the order of a few nanometres. Further investigation should be conducted.
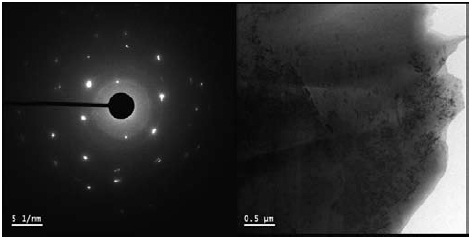
Fig. 10 - A) SAED pattern and B) TEM micrograph of the interface aluminium/titanium coating.
3.3 Optimization
This wide size distribution that results in particles badly bonded between them, and sometimes merely trapped, is the main reason to the high number of voids and the non-uniformity (both hardness and morphology) of the coating. In order to further optimize the process, a powder with a narrower size distribution should be used. So, to analyse the importance of the particle size in this process, the previous powder was sieved to two groups: one containing the particles between 40-60μm and the other the ones between 22-40μm. Then the feeding rate was maintained at 1-3rpm, the temperature at 750°C and two different pressures were used 35-40bar and 32-35bar. The transversal cuts are shown in Figure 11 for 40-60μm and Figure 12 for 22-40μm and the respective microstructures in Figure 13 and Figure 14. The coatings properties are represented in Table 4. It can be seen that, thanks to the sieved powder, all the coatings present a more uniform structure with less voids and porosity. When comparing the results for both powder groups, the coatings with higher particle size are rougher and a bit thicker, but again the hardness is less uniform. The denser structure resulting from the smaller particle size, together with its uniformity, makes the size distribution between 22-40μm the best, of the ones tested, for cold spray.
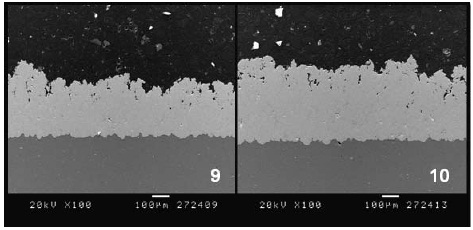
Fig. 11 - SEM micrograph of the titanium coating after the powder was sieved and using the fraction 40-60µm. Number 9 corresponds to a pressure of [35,40]bar and 10 to [32,35]bar.
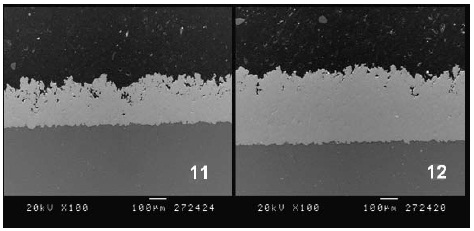
Fig. 12 - SEM micrograph of the titanium coating after the powder was sieved and using the fraction 22-40µm. Number 11 corresponds to a pressure of [35,40]bar and 12 to [32,35]bar.
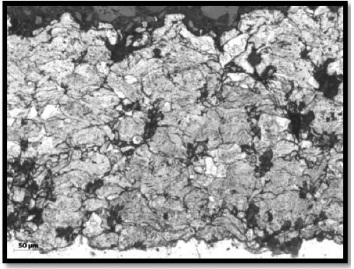
Fig. 13 - Optical micrograph of the coating number 10 microstructure after etched with Keller's reagent.
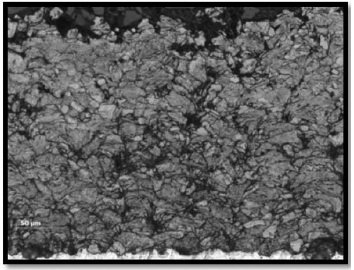
Fig. 14 - Optical micrograph of the coating number 12 microstructure after etched with Keller's reagent.
Table 4 - Coating properties for the optimized conditions.

And once again, comparing the two used pressures, the highest pressure results in a lower coating thickness and in higher porosity proving that the 30-35bar is the ideal value for the deposition of titanium onto these aluminium substrates. Having this in mind, slightly modified adhesion tests, but following the ASTM C-633 standard [19], were conducted in order to determine the bonding strength. The test consists of gluing a cylindrical coated specimen with a resin to an uncoated sand-blasted specimen, as it can be seen in Fig. 15. The obtained results are shown in Table 5.
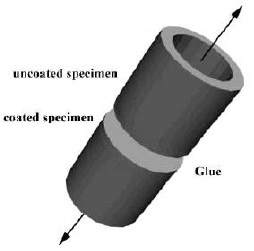
Fig. 15 – Set-up for the adherence test.
Table 5 – Adhesion test results for the conditions 10 and 12.
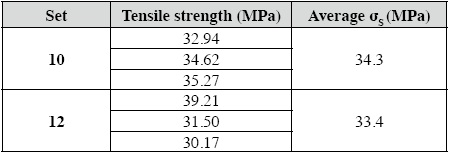
The optimum bond strength for a coating is given whenever the failure occurs between the glued surfaces (coated and non-coated surfaces). The used glue resists approximately 70MPa and none of the titanium coatings was able to endure such value. All the coatings exhibited adhesive failure since their rupture was by the substrate/coating interface. The tensile strength average value is very close for both the subjected coatings and it is over the 30MPa, normal value for the plasma-sprayed titanium coatings. However, the values vary between 30MPa and 39MPa, and this last value is a very good result. So, further optimization should be conducted in order to dislocate the average tensile strength value closer to 40MPa.
Once the main goal is to reach a fully dense coating, further optimization was conducted by removing all the porous area. Figure 16 shows coating number 12 after the removal of the external porous layer. The resulting thickness was 240 ± 2µm and the porosity was reduced to 0.05%. The coating presented a superficial hardness of 281 ± 40 HV. This value is higher than the previous result for coating 12 since there is more resistance to deformation because the coating is more compact.
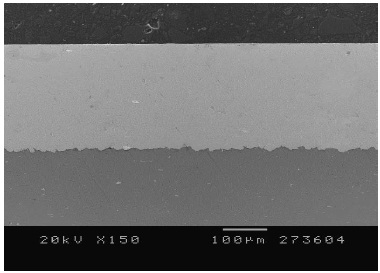
Figure 16 - Coating 12 after removing of the porous zone
4. Conclusions
Concerning the main objectives proposed at the beginning and in agreement with the experimental results following the factorial analysis, it can be concluded as following:
● Principally and most importantly, it was easily and fast obtained a dense pure titanium coating onto aluminium 7075, with thickness higher than 300µm and no microstructural changes.
● The effects of gas temperature, gas pressure, and powder feeding rate on cold sprayed pure titanium coatings onto aluminium substrates were investigated. All resulting coatings were characterized in terms of their microstructures, coating thickness and porosity and, micro-hardness. The best set of parameters was chosen and the corresponding coating was deeper characterized regarding its hardness profile, phase composition and particle distribution.
● The parameter that influences more the coating thickness, rising it, is the feeding rate. For the same feeding rate, the coating thickness increases with the temperature and decreases with the pressure. Coatings over 300µm thickness were easily achieved through cold spray.
● For titanium deposition, higher temperature results in a denser coating while high pressure (for the used combination of parameters) increases the porosity due to an erosion effect provoked by the too high particle velocities.
● Mainly, temperature and pressure affect the plasticity of the particles: the higher the temperature is for the same pressure value, the more plastic will be the material and there will be less rebounding; on the other hand, for a same temperature, a higher pressure can be favourable for a better disposal of the particle to adhere to the substrate or a former bonded particle but, above a specific value, it can cause a ballistic effect leading to erosion, which in our case succeeded at 35-40bar.
● The particle size distribution is of greater importance in the cold spray process. A high size distribution leads to non-uniform coatings regarding thickness, porosity and hardness, and makes the process non-reliable since particles can either reach or not the critical velocity, and depending on the main fraction of the powder that composes the coating, the properties will vary a lot. When the distribution is narrower, the process becomes reproducible, and the coating properties become more homogeneous.
● A powder with higher particle size, but narrow distribution, results in a thicker coating when compared with a powder of smaller particle size. However, the coatings properties are less uniform.
● Regarding the bond formation in cold spray, were found results that support either the occurrence of a solid-state diffusion with adiabatic shear instabilities. The bonding strength of the deposited coatings was around 34MPa with high potential to increase to 40MPa.
● After optimization, the cold spray process when compared to the conventional thermal spray techniques, results in coatings with very good properties and cost-time effective (higher coating thickness can be achieved in less time and with less money investment), making it ideal for industrial applications.
● When the external porous layer is mechanically removed, a fully dense coating is obtained.
Acknowledgements
The authors are grateful to the Generalitat de Catalunya (Departament de Salut) for the project BARCINO and for the project 2009-SGR 00390, as well as the Ministerior de Ciencia e Innovación for the MAT2009-10827 project. Maria Barbosa wants specially to thank the Thermal Spray Centre-UB for her grant during her stay in the research group.
References
[1] A. Beuthner, No Vacuum Plasma published in the Fraunhofer Magazine 1, 2002, pp. 46-47
[2] K. Kim, et al., Grain refinement in a single titanium powder particle impacted at high velocity, Scripta Materialia, 51, 2008, pp. 768-771
[3] T. Novoselova, et al., Experimental study of titanium/aluminium deposits produced by cold gas dynamic spray, Surface and Coatings Technology, 200, 2006, pp. 2775-2783
[4] W. Wong, et al., Effects of gas temperature, gas pressure and particle characteristics on cold sprayed pure titanium coatings, Thermal Spray 2009: Proceedings of the International Thermal Spray Conference, pp 213-236
[5] G. Bae, et al., Bonding features and associated mechanisms in kinetic sprayed titanium coatings, Acta Materialia, 57 (19), 2009, pp 5654-5666 [ Links ]
[6] S. Klinkov et al. Cold Spray Deposition: Significance of Particle Impact Phenomena. Aerospace Science and Technology, 10, 2005, vol. 9, no. 7, pp. 582-591
[7] H. Wang, et al., Effect of Process conditions on microstructure and corrosion resistance of cold-sprayed Ti coatings, Journal of Thermal Spray Technology, 17 (5-6), 2008, pp 736-741
[8] T. S. Price, et al.. Effect of Cold Spray Deposition of a Titanium Coating on Fatigue Behavior of a Titanium Alloy. Journal of Thermal Spray Technology, 15, 2006, pp. 507-512
[9] V. K. Champagne, The cold spray materials deposition process: Fundamentals and applications. Woodhead Publishing in Materials, 2007
[10] J. Pattison et al., Standoff distance and bow shock phenomena in the Cold Spray process. Surface & Coatings Technology, 202, 2008, pp. 1443-1454
[11] F. Raletz et al., Critical particle velocity under cold spray conditions. Surface & Coatings Technology, 201, 2006, pp. 1942-1947
[12] M. Grujicic et al., Adiabatic shear instability based mechanism for particles/substrate bonding in the cold-gas dynamic-spray process. Materials and Design, 25, 2004, pp. 681-688
[13] C.-J. LI and W.-Y. Li, Deposition characteristics of titanium coating in cold spraying., Surface and Coatings Technology, 167, 2003, pp. 278-293
[14] L. Ajdelsztajn et al., Synthesis and mechanical properties of nanocrystalline Ni coatings produced by cold gas dynamic spraying. Surface & Coatings Technology, 201, 2006, pp. 1166-1172
[15] T. H. Van Steenkiste et al., Kinetic spray coatings. Surface and Coatings Technology, 111, 1999, pp.62-71
[16] B. Jodoin et al. Effect of particle size, morphology, and hardness on cold gas dynamic sprayed aluminum alloy coatings. Surface & Coatings Technology, 201, 2006, pp. 3422-3429
[17] S. H. Zahiri, et al., Elimination of porosity in directly fabricated titanium via cold gas dynamic spraying. Journal of Materials Processing Technology, 209, 2009, pp. 922-929
[18] Y. Xiong et al., Dynamic amorphization and recrystallization of metals in kinetic spray process. Applied Physics Letters, 92, 2008
[19] Unpublished results of the Thermal Spray Centre, University of Barcelona, 2009
Note
[a] Figure 16 shows a CPT coating (Coating 12) after removal of the external porosity layer.


