Introduction
Coronal preflaring is an early step of the root canal preparation procedure aimed to pre‑enlarge the canal’s cervical third before working length determination.1 This step has been advocated to allow the instruments to advance apically with less contact with the coronal dentin walls and provide straight‑line access to the root canal’s middle third. Thus, it reduces the chance of iatrogenic complications such as instrument fracture,2 ledge formation, or canal transportation, while allowing a superior tactile sensation and enhancing working length determination and irrigation penetration.3,4
Although minimally‑invasive approaches recommend avoiding the over‑enlargement of the pericervical dentin in order to preserve tooth strength,5 this step might be of major importance, mostly in very narrow root canals.4 This early step of cervical pre-enlargement may be performed using Gates Glidden burs or specially‑designed nickel‑titanium (NiTi) instruments,4 such as the ProTaper Gold SX instrument (PTG SX) (Dentsply Maillefer, Ballaigues, Switzerland). These instruments are traditionally large‑
tapered to enlarge the root canal’s coronal third and, simultaneously, sustain high torsional stress in narrow root canals. Due to its innovative, progressive tapered design, ProTaper became one of the most used root canal preparation systems in several countries.6,7 Probably due to its worldwide acceptance, several ProTaper replica‑like instruments became available in the market. These instruments have been defined as “replica‑like” due to presenting the same number of instruments and color‑coding, as well as similar or equivalent nomenclature.8 Traditionally, these instruments are marketed by less‑known companies at lower prices, probably to mitigate one of the most reported problems of using NiTi instruments: the high cost of the original brands, according to the clinicians.6,9 Although PTG SX replica‑like instruments are already available in the market, there is currently no scientific support regarding their characteristics and safety. Considering the lack of knowledge on PTG SX replica‑like instruments, a multimethod research was conducted to assess their design, metallurgic features, torsional strength, and flexibility. The null hypothesis to be tested was that there was no difference between the SX replica‑likes and the original Pro-Taper instruments regarding design, torsional strength, and flexibility.
Material and Methods
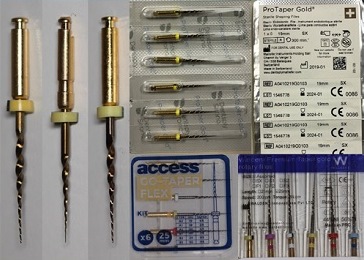
Ninety‑three SX NiTi instruments of two replica‑like (Premium Taper Gold and Go‑Taper Flex) rotary systems that replicate the premium brand ProTaper Gold (Table 1, Figure 1) were assessed regarding their design, nickel‑titanium (NiTi) composition, phase transformation temperatures, and torsional and bending strengths. The replica‑like systems for the present study were selected according to a previously reported definition.8

Figure 1 Macroscopic images of two replica‑ likes and the original brand SX instruments (from left to right: ProTaper Gold, Premium Taper Gold, and Go‑Taper Flex) with the corresponding labelled packing box.
a Reference price values of replica‑like instruments were rated at the time they were acquired based on the reference price of the premium brand instrument categorized as 1.
Six random new instruments were selected in each group for design assessment. The stereomicroscopic visual inspection was performed with a dental operating microscope (Opmi Pico, Carl Zeiss Surgical, Germany) under a 3.4x and 13.6x magnification to analyze the following characteristics: (a) number of blades in the active area (measured in units); (b) helix angle average in the active area (measured in degrees). A photo was taken perpendicular to the long axis of the instruments using a Canon EOS 500D camera (Canon, Tokyo, Japan) and transferred in the jpeg format to the ImageJ software (Laboratory for Optical and Computational Instrumentation [LOCI], Wisconsin, USA). In ImageJ, the six most coronal helix angles were measured three times and averaged, and (c) major defects or deformations such as distorted, missing, or twisted blades, were identified. High‑magnification analysis was conducted on a conventional scanning electron microscope (SEM) Hitachi S‑2400 (Hitachi, Tokyo, Japan) to qualitatively assess the following: (a) blade spiral design (symmetrical or asymmetrical, with or without radial lands); (b) instrument’s tip (active or non‑active tip); (c) cross‑sectional geometry; (d) surface marks associated with a possible machined production process; (e) minor defects or deformations.
Two laboratory tests were performed for metallurgical characterization: energy‑dispersive X‑ray spectroscopy (EDS/SEM) and differential scanning calorimetry (DSC). In EDS/SEM, three new SX instruments per group were analyzed using a conventional SEM (Hitachi S‑2400; Hitachi, Tokyo, Japan) equipped with an energy‑dispersive X‑ray spectrometer with light elements detector (Bruker Quantax, Bruker Corporation, Billerica, MA, USA). Before this analysis, all instruments had their surface cleaned by immersion on an acetone bath for 2 minutes and were mounted on a sample holder placed in the microscope chamber. The vacuum was created for approximately 10 minutes. As for the operative setting conditions, the acceleration voltage was 20 kilovolts, and the filament current was 3.1 amp at a 25‑mm work distance on a surface area of 400 μm2. Results were assessed using the Sigma Scan software (Systat Software Inc., San Jose, CA) and the proportions of nickel and titanium were obtained by a typical spectrum.
The DSC test was carried out in two different instruments of each system following the American Society for Testing and Materials’ guidelines.10 It was performed on 3 to 5‑mm fragments with a weight of 15-20 mg removed from the active portion of the tested files. Each fragment was submitted to a chemical etching bath composed of a mixture of 25% hydrofluoric acid, 45% nitric acid, and 30% distilled water for approximately 2 minutes, followed by neutralization with distilled water. Then, they were weighed on an M‑Power microbalance (Sartorius, Goettingen, Germany). Two aluminum pans (38 mg and 5‑mm inner diameter) were prepared, one with the fragments to be tested and the other empty (control). The thermal cycle test was conducted on a differential scanning calorimeter (DSC 204 F1 Phoenix; Netzsch‑Geratebau GmbH, Selb, Germany) under a gaseous nitrogen atmosphere and comprised: (a) heating from room temperature to +150 oC, (b) holding this temperature for 2 min, (c) cooling to ‑ 150 oC, (d) holding this temperature for 2 min, (e) heating to +150 oC, (f) holding this temperature for 2 min and (g) cooling to room temperature. Heating and cooling rates were 10 K/min. The final data were assessed using the Netzsch Proteus Thermal Analysis (Netzsch‑Geratebau GmbH) software, from which the R‑phase start (Rs) and R‑ phase finish (Rf) temperatures were extracted. In each group, the DSC test was performed twice, for the repetition to confirm the results of the first test.
The SX instruments’ mechanical performance was determined by torsional and bending tests at room temperature (20 oC) following international specifications.11,12Prior to each test, the brand new instruments were visually inspected under stereomicroscopy (×13.6 magnification) to detect any deformation or defects that would exclude them, but no deformities were noted. The sample size was calculated considering the highest difference observed between the PTG SX instrument and one
of the replica‑like files after the six initial measurements. Considering an 80% power and an alpha‑type error of 0.05 for the maximum torque (effect size of 0.50 } 0.28), angle of rotation (effect size of 10.83 } 53.61), and maximum load (effect size of 118.79 } 66.78) tests (always PTN vs. Go‑Taper Flex), a total sample size of seven instruments per group was determined.
Therefore, a final sample size of ten instruments per group was chosen. The torsional strength test was performed on a static torsion model. The instruments were mounted on a straight position on a torsiometer TT100 (Odeme Dental Research, Luzerna, Santa Catarina, Brazil) and clamped at their apical 3 mm (D3). Then, they were rotated on a constant 2 rpm pace in a clockwise direction until fracture. The software calculated the maximum torque (in N.cm) before rupture and the angle of rotation (in degrees). In the bending resistance test, instruments were mounted by the file grip in the file holder in a 45o position regarding the floor plane and pointing down, while simultaneously 3 mm of their tips were attached to a wire linked to a universal testing machine (DL‑200 MF loading cell; EMIC, Sao Jose dos Pinhais, Brazil). The bending test was conducted with a 20‑Newton load applied at a 15 mm/min constant pace until the instrument underwent a displacement of 45o. The maximum load (in gram/force [gf]) required to induce the 45o displacement was assessed in the Tesc v3.04 software (Mattest Automacao e Informatica, Brazil).
All collected data was introduced in the SPSS software (IBM SPSS Statistics Version 22, Chicago, IL, USA). The dependent variables of maximum torque, angle of rotation, and maximum bending load were submitted to analytical analysis. The assumption of normality was assessed using the Shapiro‑Wilk test. The results were determined in mean and standard deviations or median and interquartile range. The helix angle, angle of rotation, and maximum bending load results were compared using the one‑way ANOVA and post hoc Tukey tests, while the Kruskal‑Wallis test was chosen for the maximum torque.
The significance level was set at 0.05.
Results
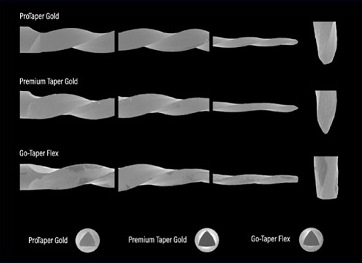
The stereomicroscopic analysis showed similarities among the three tested SX instruments regarding the number of blades and helix angle (P>0.05), while no major defects or deformations were detected (Table 2). The SEM assessment confirmed the blade’s symmetry, with no radial lands and similar cross‑sections geometry (Figure 2). Additionally, although differences were observed between PTG’s and Premium Taper Gold’s tip design, the most relevant difference was observed in the Go‑Taper Flex instruments, which presented a geometry similar to a flat tip. As for the high‑magnification surface finishing analysis, differences were noted between instruments: PTG showed marks compatible with the machining process, Premium Taper Gold showed a surface with fewer irregularities, while the Go‑Taper Flex revealed the most irregular surface appearance (Figures 2 and 3).

Figure 2 SEM images of the ProTaper Gold and two replica‑ like SX instruments (from top to bottom): the coronal, middle, and apical sections of the cutting blades, their tips’ design, and cross‑sectional geometry. Differences can be observed in the instruments’ tips.

Figure 3 Representative SEM images of each e finishing. Premium Taper Gold and Go‑Taper Flex showed less and more irregularities, respectively.
The EDS/SEM analysis revealed a NiTi alloy and did not detect any other metallic element. The Ti/Ni superficial atomic composition was nearly equiatomic with a detected Ti/Ni atomic percentage of 50.5/49.5%, 50.3/49.7%, and 50.5/49.5% for PTG, Premium Taper Gold, and Go‑Taper Flex instruments, respectively.
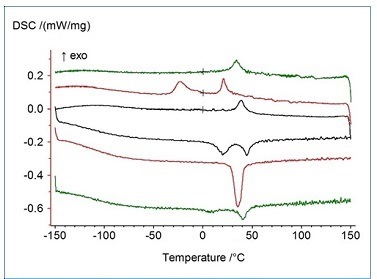
In the DSC test, the Premium Taper Gold showed mixed austenite plus R‑phase, with R‑phase start (Rs) and finish (Rf) temperatures at cooling near 30 oC and 15 oC, respectively, which represents distinct phase transformation temperatures compared to the PTG. PTG (Rs ~48oC and Rf ~30oC) and Go‑Taper Flex (Rs ~43oC and Rf ~25oC) revealed closer phase transformation temperatures with more martensitic characteristic (Figure 4). Table 3 and Figure 5 summarize the mechanical tests’ results.
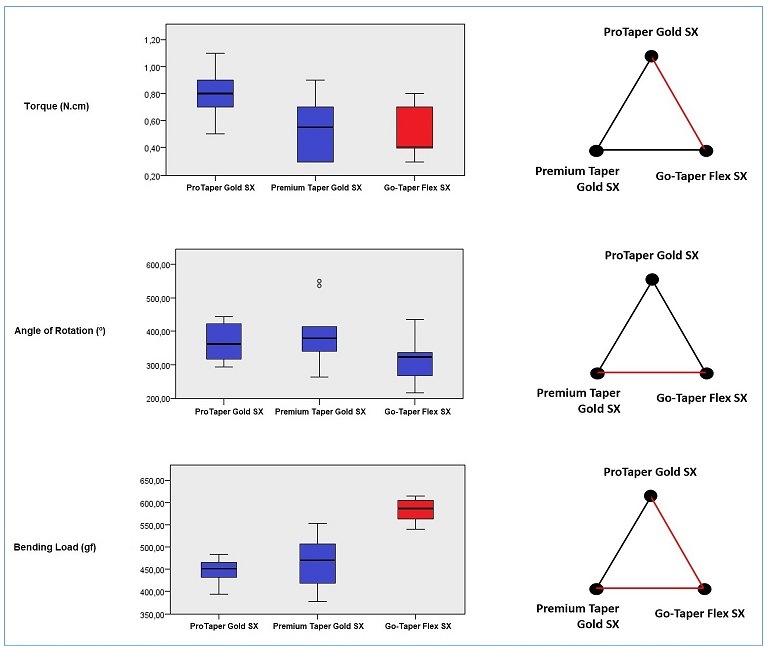
In the maximum torque to fracture, a significant difference was observed between the PTG (0.8 N.cm) and Go‑Taper Flex (0.4 N.cm) instruments (P<0.05). Regarding the angle of rotation, no difference was noted between the replica‑likes and the original PTG (P>0.05). As for maximum bending load, Go‑Taper Flex showed less flexibility (mean of 582.2 gf) compared to PTG (447.1 gf) and Premium Taper Gold (464.3 gf) instruments (P<0.05).

Figure 4 DSC charts showing the cooling curves on the top (right to left direction) and the heating ones on the bottom (left to right direction) of the ProTaper Gold (black), Premium Taper Gold (red), Go‑Taper Flex (green) SX instruments. All R‑phase start temperatures were above the room temperature (20ºC), with the Go‑Taper Flex presenting the closest result to the original ProTaper Gold.

Table 3 Mean (standard deviation) and median [interquartile range] results of the mechanical tests.*
* Figure 5 summarizes the statistical differences among tested instruments

Figure 5 Mechanical behavior results of the tested SX files are shown by combined box‑and‑whisker plots (left) of torque, angle of rotation, and bending load. The blue colored boxes indicate that the obtained results of the replica‑ like instruments were similar to the reference brand (ProTaper Gold), while red colored boxes show significant differences. The triangular graphic (right) shows the significant differences between groups (red line represents a P<0.05).
Discussion
The manufacture of NiTi root canal preparation systems traditionally follows a standard flow of research and development, product testing, and marketing under certain quality
standards. This workflow has been improved and consolidated by well‑known companies that can be defined as premium brands. Research, development, and marketing factors are of huge importance when weighting the final product price since they represent the amount of time, effort, and money applied by the companies to create and promote their products. However, other factors such as product uniqueness,
market competition, product effectiveness, international patents, health safety certificates, and profit must also be considered.13,14
In the past few years, some less‑known companies came into the market with mechanical NiTi systems similar to those produced by premium brand companies, the so‑called replica‑like systems.8,15Although these companies’ time, effort, and investment are not clear, the reality is that their products are marketed at a much lower price, which in the case of the ones here studied may be as low as 29% of the original premium brand product. It is important to notice that both replica‑like systems tested in the present study possess the CE 0197 certificate, which means that they match the standards of medical quality demanded by the European Community (a certification equivalent to the Food and Drug Administration in the United States). Despite the lack of information regarding their performance and safety, their reduced price may compensate due to the high costs of NiTi rotary systems, as previously reported by clinicians.6,9
The present study aimed to compare two PTG SX replica‑like instruments with the original brand using a multimethod research to assess different aspects such as design, metallurgic features, and mechanical performance.8,16
Overall, no differences were observed among the tested instruments in the number of blades, helix angle, design symmetry, cross‑sectional geometry, and Ti/Ni atomic percentage.
However, differences were observed in the tip design, surface finishing, phase transformation temperatures, and mechanical performance. Therefore, the null hypothesis was rejected.
Although some design differences could be noted between PTG and Premium Taper Gold instruments, the most relevant was observed in the Go‑Taper Flex instrument: a flat tip, mimicking the fracture pattern of an instrument subjected to a torsion test, but without any visible plastic deformation of the blades. The inspected instruments were picked from sealed packages and placed directly into the SEM sample holder to minimize the operator handling, therefore excluding any handling damage. Although this flat tip feature was observed in the several SX instruments inspected, it could not be concluded whether it was a defect or a geometric characteristic. Moreover, this feature was not observed in other Go‑Taper Flex instruments (S1, S2, F1, F2, and F3) (unpublished data), which presented a conventional tip design (non‑flat tip). Therefore, the impact of that difference in these instruments’ shaping ability and safety is still unclear.
Differences in the instruments’ mechanical performance must be analyzed considering multiple factors that may be more or less relevant depending on the test. Torsional strength refers to the ability to sustain torsional stress before fracture and is a highly advisable characteristic for coronal shaper instruments whose goal is to widen a narrow root canal entrance into a large size.17,18 The angle of rotation is related to the capacity to sustain deformation before rupture under a torsional load,19 and the maximum bending load required to perform a predefined displacement represents a flexibility score in which lower loads reflect superior flexibility. It is also a recommended characteristic for coronal shaper instruments to prevent pathway deviation or cervical‑ third straightening,19 preserving the pericervical dentin, as advocated in minimally‑invasive procedures.
The maximum torque to fracture was lower in the Go‑Taper Flex than the PTG SX instrument, which might be partially explained by its worst surface finishing leading to a more rapid microfracture development and propagation.20 The similarities of maximum torque, angle of rotation, and bending load results observed between PTG SX and Premium Taper Gold instruments may be explained by the non‑full austenitic characteristics observed at the test temperature, the similarities in the instruments’ design at the maximum stress level, and their Ti/Ni proportions. The lowest flexibility was observed in the Go‑Taper instruments and, although this result cannot be explained based only on the assessed characteristics, it could be influenced by other aspects such as the dimensions of the instrument submitted to the bending test, which were not measured in the present study. To the best of the authors’ knowledge, no previous studies have reported torsional and bending strength for PTG SX instruments or the tested replica‑like ones; therefore, the present results cannot be compared with previous literature. However, a previous study comparing ProTaper Universal instruments and six replica‑likes revealed differences in mechanical performance despite the design similarities.15
The multimethod approach was one of the strengths of the present investigation, as it allowed a more comprehensive understanding of the tested instruments.16 Accordingly, well‑established international protocols were followed, enhancing the internal validity of the methodologies.10‑ 12Another strength is the use of replica‑like coronal shaping instruments that are already being marketed and used in clinics, but with no available reported data in the literature regarding their performance and safety, making the present study relevant to both the scientific and clinical points of view.
With regards to the study’s limitations, it should be mentioned that other replica‑like orifice shapers exist in the market and were not tested herein. Besides, some additional characteristics, such as cutting efficiency, shaping ability, and certain instrument geometries, like dimensions, were not considered in the present methodology, as was not the influence of temperature. Further studies should focus on other replica‑like instruments available in the market and understanding the similarities regarding instruments’ pitch, core volume, and dimensions, using a reliable 3‑dimensional analysis.
Conclusions
Overall, both replica‑like SX instruments were similar to the PTG premium brand regarding the number of blades, helix angles, design symmetry, cross‑sectional geometry, and Ti/Ni atomic proportions. Geometric differences were noted regarding the instruments’ tip. Premium Taper Gold showed the smoothest surface finishing, while the Go‑Taper Flex presented a surface with more irregularities. Distinct phase transformation temperatures were observed among systems. Go‑Taper Flex had the lowest maximum torque and less flexibility when compared to PTG. No significant differences were noted between Premium Taper Gold and PTG SX instruments in the mechanical tests.


