Introduction
Teeth are essential for aesthetics and several physiological functions, such as chewing, swallowing, and speaking. Tooth loss may compromise these normal functions and the person’s quality of life. The 2021 Oral Health Barometer reported that 8.7% of Portuguese were fully edentulous.1Thus, according to the population census estimations, Portugal had around 800000 edentulous patients in 2021.
Although current treatment options also include fixed rehabilitation with implants, complete removable dentures remain the main oral rehabilitation choice for edentulism, primarily for economic reasons.1 Conventional protocols for constructing complete removable dentures have been used for more than 100 years and are well established and part of contemporary clinical practice.2 However, conventional processes are subject to human processing errors, inaccuracies, and additional time.1
On the other hand, in recent years, computer-aided design and computer-aided manufacturing (CAD/CAM) technology has been applied to prosthodontics, mainly for fixed prostheses, where its protocols have already been proved. Attempts to manufacture a complete removable dental prosthesis with CAD/CAM methods began in the 1990s,3 and it has become more popular in recent years, largely using mixed protocols with conventional and digital steps. A review of the literature in 2018, evaluating the advantages of CAD/CAM versus conventional complete dentures, concluded that CAD/CAM dentures’ reported main advantages were less clinical chair time, fewer visits, data digital archiving, and more favorable clinical and patient-centered outcomes, including significantly higher retention.4,5
Two main CAD/CAM techniques are used to manufacture complete dentures: milling and rapid prototyping (3D printing).
The milling method (MM) is a subtractive process where the complete denture is fabricated at a milling station using a pre-polymerized poly-methylmethacrylate (PMMA) block disk manufactured under high pressure. On the other hand, the rapid prototyping method (RP) is an additive process that uses photosensitive liquid resins repetitively layered on a support structure and polymerized by an ultraviolet or a visible light source.6 These techniques have distinct advantages and disadvantages.
MM manufactures complete dentures from a pre-polymerized PMMA block disk. Thus, it eliminates the shrinkage and porosities caused by the polymerization process and produces dentures with less residual monomer and better physical properties.7 However, this reduction in residual monomer contente has been reported as not substantial compared to conventional heat-polymerized complete dentures.8 Moreover, large milling units are costly and may be suitable only for comercial manufacturing centers and not accessible for individual offices or small dental laboratories.6
The RP process uses unpolymerized resins to manufacture complete dentures that, once processed, require an additional final light-polymerization step to complete the process. Thus, because acrylics are not completely polymerized before the final light-polymerization procedure, polymerization shrinkage is theoretically possible, and denture deformation can occur when demounting the partially polymerized resin from the build platform.6,9 Furthermore, a residual layer of unpolymerized resin invariably remains on the surface and must be eliminated by thorough rinsing with a suitable solvent (usually alcohol). Another disadvantage of this method is that the printed prostheses are usually made of single-color resins, which can be a considerable aesthetic limitation. On the other hand, the claimed advantages of an additive manufacturing process include less material waste and low infrastructure costs.9
Although both techniques have been reported to yield clinically acceptable results, an in-vitro study reported better accuracy of the intaglio surfaces in milled complete dentures compared to RP complete dentures,10 probably due to the potential denture deformation when demounting the partially polymerized resin from the build platform.11 However, further research is required to determine which technique has the best patient acceptance.
In the early stages of CAD/CAM application in Prosthodontics, laboratory scanners were used to digitize gypsum cast before the milling and manufacturing of the denture. In the last two decades, many commercially available intraoral scanners have been developed, and both in-vivo and in-vitro studies have examined their accuracy and precision compared to conventional impressions.12 The accuracy of intraoral scanners in recording clear anatomic landmarks, like hard tissues with attached mucosa, was considered comparable to conventional edentulous arch impressions. However, higher discrepancies were noted when digitizing mobile tissues, like the peripheral border and the soft palate.13 Despite this limitation, total digital workflow protocols for constructing dentures have been described for several years.14
This article describes a clinical and laboratory alternative protocol used at the University of Lisbon for manufacturing complete CAD/CAM removable dentures. The aim of this work is to understand whether CAD/CAM technology can be an added value to denture fabrication, considering the times and costs involved in the case.
Case Report
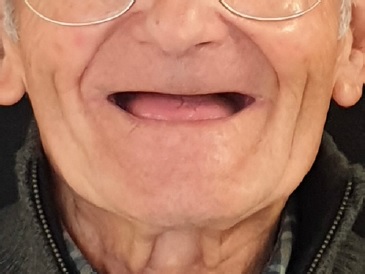
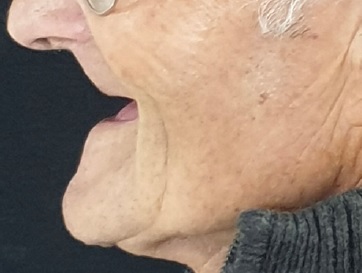
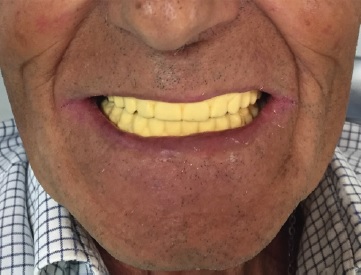
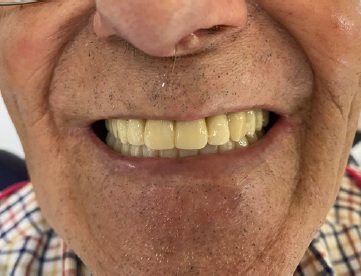
A fully edentulous 90-year-old male patient (Figures 1 and 2) attended the Department of Removable Prosthodontics of the Faculty of Dental Medicine of the University of Lisbon. His teeth had been extracted 30 years earlier due to caries, and he had been using a complete removable denture since then. Systemic pathologies were not reported, and clinical examination revealed a highly reabsorbed residual ridge without other changes in the mucosa. All possible rehabilitation treatments were explained, and due to financial constraints, the patient agreed to new dentures. Five appointments were planned with the following respective goals: preliminary impressions, definitive impressions, jaw relation record, teeth try-in, and insertion.
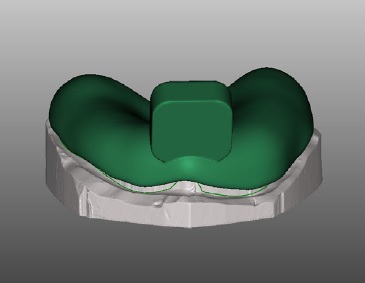
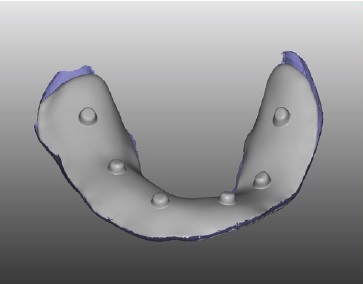
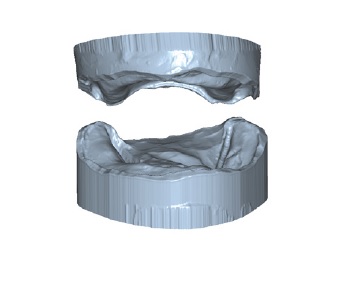
Post-insertion denture adjustment appointments would be scheduled as needed. Preliminary impressions were made with irreversible hydrocolloid (Hydrogum 5, Zhermack, Italy) and stock impression trays (Doric Master Trays, Schottlander, UK). Then, gypsum type III (Pro-Solid Super, Pro-Dental, Germany) was poured to obtain the preliminary casts. The preliminary casts were scanned (S 600, Zirkonzahn, Italy), and the custom trays were designed (Zirkonzahn.Tray, Zirkonzahn, Italy) and 3D printed (NextDent 5100, 3D SYSTEMS, The Netherlands) with light-polymerizing PMMA resin (NextDent Tray, 3D SYSTEMS, The Netherlands) (Figure 3). The clinician did the border molding with impression compound (Kerr, SpofaDental, Czech Republic) and the final impression with zinc-oxide eugenol paste (Cavex outline, Cavex, The Netherlands). After boxing the impressions, the master casts were obtained in gypsum type III (Pro-Solid Super, Pro-Dental, Germany) and digitalized (S600, Zirkonzahn, Italy). The palatal sealing was done in the cast before the definitive cast scanning. Afterward, baseplates were designed (Zirkonzahn. Tray, Zirkonzahn, Italy) (Figure 4) and 3D printed (Next-Dent 5100, 3D SYSTEMS, The Netherlands) with light-polymerizing PMMA resin (NextDent Tray, 3D SYSTEMS, The Netherlands), and the wax occlusion rims were made with pink wax.
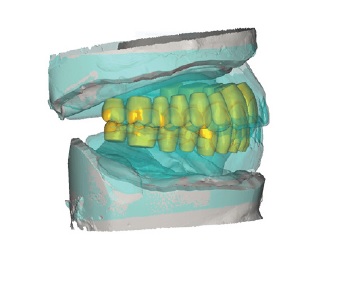
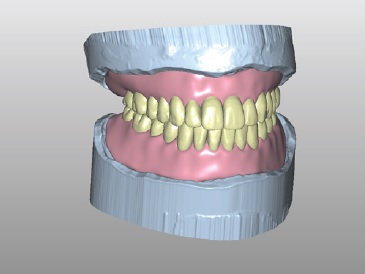
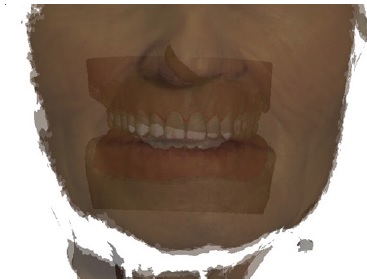
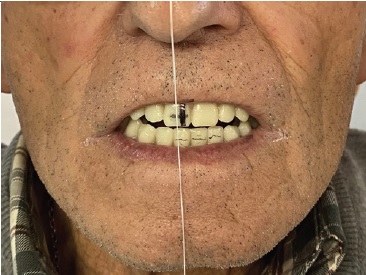
On the third appointment, the patient’s labial fullness and occlusal plane were determined, the aesthetic lines were drawn on the wax rim, and the occlusal vertical dimension and jaw relation were recorded (Figure 5). The teeth try-in was sent to the laboratory, where the jaw relation record was scanned using the Zirkonzhan scanner (S600, Zirkonzahn, Italy). Then, teeth were selected from a digital library (AIDA, Zirkonzhan library, Italy), according to the patient’s older dentures and the lines drawn on the wax rims, and set using a modulation software program (Modellier by Zirkonzhan, Italy) (Figures 6, 7, and 8). Additionally, a facial scan of the patient was obtained using a facial scanner (Face hunter, Zirkonzahn, GmbH) with the patient at rest, smiling, and in occlusion. The facial scan gives the tooth size and shape, the amount of tooth exposure, the midline, and the correct buccal corridor (Figure 9). After the facial scans, the master casts and the jaw relation records were superimposed.
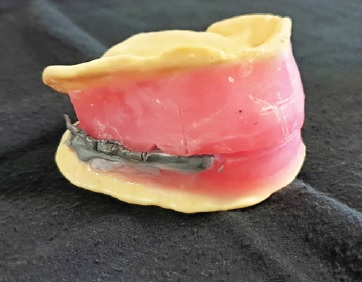
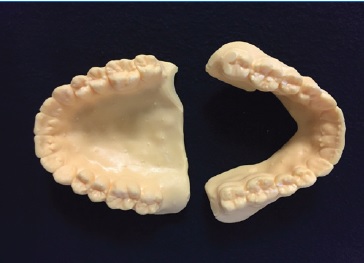
Using another 3D printer (Nextdent LCD1, Nextdent B.V., The Netherlands), a teeth try-in was made with a light-cure resin (NextDent Try-In, 3D SYSTEMS, The Netherlands). After printing, the try-in was ultrasonically cleaned with 99.5% isopropyl alcohol (AGA, Portugal) for 15 minutes and put into the LC-3D Print Box (Nextdent B.V., The Netherlands) for the final photopolymerization (10 minutes) (Figure 10). The gingival area of the single-color try-in was then covered with a thin layer of pink wax to define the gingiva/teeth line and help the clinician better perceive tooth length, tooth shape, and the gingival contour (Figures 11 and 12). This layer of wax was applied only on the vestibular flap from one second premolar to the other.
On the fourth appointment, the try-in was evaluated in the patient, and a few minor clinical adjustments were made, particularly in occlusion (prematurity in the lower second molars’ distal cusps). Once the try-in was aesthetically and functionally validated, the tooth color was selected with a conventional tooth shape guide (Vita Zahnfabrik), and the try-in was sent to the laboratory to finish the denture (Figure 13). In the laboratory, the try-in was scanned, and the buccal surface of the gingival area was reduced by about 1 mm, both in the lower and upper digital dentures. This reduction aimed to allow the setting-up of pink acrylic resin to simulate the gingival area after printing, and it was performed between the tooth-gingival transition and the limit of the flap in the vestibular sulcus (Figure 14). The dentures were printed (Nextdent LCD1, Nextdent B.V., Netherlands) using a resin for crowns and bridges (Crowntec, Saremco Dental AG, Switzerland), color A2.
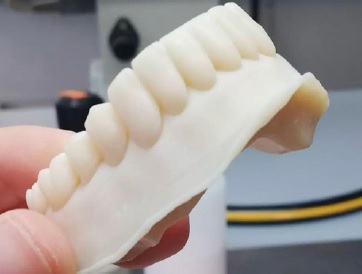
Figure 14 Denture after print, with a reduction of about 1 mm in the buccal surface of the gingival area so that pink acrylic could be set up to simulate the gingival area.
After cleaning, the dentures were exposed to a final photopolymerization in an LC-3D Print Box (Nextdent B.V., The Netherlands) for 10 minutes. Then, the gingival area was covered with a thin layer of pink autopolymerizing acrylic (Probase Auto, Ivoclar Vivadent) (Figure 15). Each tooth was also individually pigmented with a photopolymerized acrylic (Vita Akzent LC, Vita Zahnfabrik, Germany) for a more natural appearance (for example, canines with a higher chroma) (Figure 16).
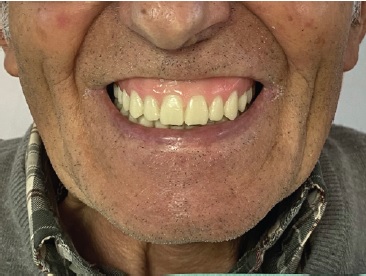
At the denture insertion appointment, minor occlusal adjustments were made. The patient did not report pain related to the denture base (Figure 17). At the 1-week follow-up, there were no complaints of pain, and the retention was adequate (the patient did not need to use adhesive as with the previous denture). At the 6-month follow-up, the patient was very satisfied with the rehabilitation and mentioned that he could eat all kinds of food.
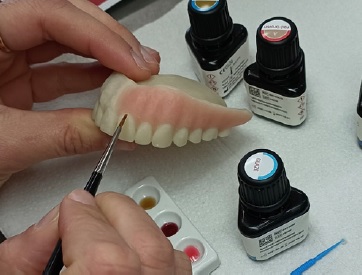
Figure 15 Teeth pigmented with a photopolymerized acrylic to customize each tooth with the chosen color.
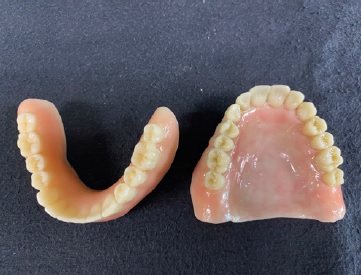
Figure 16 Dentures after application of a layer of pink acrylic on the outer face of the prosthesis.
Discussion and conclusions
The fabrication of a complete denture by the conventional method taught in most dental schools (including the FMDUL) must follow a sequence that generally requires five appointments.15 Despite its widespread use, this method has limitations, such as the time-consuming procedures of setting teeth, waxing, and flasking. Moreover, there is a risk of deformation of the heat-polymerized PMMA base and shrinkage of the resin, which may reduce the denture’s accuracy.6
This study aimed to investigate whether CAD/CAM could be an added value for removable prosthodontics. Recent studies show that CAD/CAM technology may offer similar or better results than conventional methods, including better fit of the intaglio surfaces, improved mechanical properties, and higher patient satisfaction.15-17 Furthermore, the digital workflow is associated with considerably less chairside and laboratory time2 and fewer appointments.9,15,18 Namely, some protocols advocate that intraoral scanning and digital records can reduce the number of treatment appointments from five to two while still resulting in a good-quality denture.18 However, a completely digital clinical workflow for the fabrication of complete CAD/CAM removable dentures is yet to be demonstrated, as well as alternative protocols incorporating the conventional clinical steps in a manner best suited to satisfy all the required criteria for successful fabrication.
A very precise impression is fundamental for the success of the rehabilitation. This impression can be taken using na intraoral scanner-digitally-or the conventional impression method.17 In the present protocol, after conventional impressions, the casts were scanned using a bench scanner instead of the intraoral scanner. Despite intraoral scanning’s significant benefits,19 a few disadvantages limit its application in removable prosthodontics. Currently, this method can be used for recording static impressions, which is not ideal for capturing soft-tissue morphology or documenting the extension of movable tissues.17 On the other hand, the conventional impression method with border molding captures movable soft tissues better. Thus, digitalizing the master cast with laboratory scanners provides a digital cast with the correct vestibular sulcus dimensions, allowing better denture retention through peripheral sealing. In the present case, the intraoral observation revealed edentulous arches whose residual ridges crest were very reabsorbed. Thus, every effort was made to obtain the best possible retention with the new denture. Although an intraoral scanner was available at FMDUL, we chose the conventional impression for better sealing and retention.
When digital impressions are obtained using an intraoral scanner, the patient must remain motionless, and using cheek retractors is advised. The scanning should start at the residual ridges’ crest (vestibular, then lingual). Afterward, in the maxilla, the scanning should continue to the hard palate, anteroposteriorly, with S-shaped movements. Intraoral scanning has the great advantage of allowing an impression without tissue distortion, while in a conventional impression, the weight of the impression material can cause distortions.15,18,20
The jaw relation record appointment is essential for the rehabilitation’s success. This case used occlusion rims to record the jaw relationship and vertical dimension. The occlusion rims’ base was printed, and the wax rim was applied conventionally.
Other digital protocols only record these dimensions by reading the existing denture or using a ball of polyvinyl siloxane putty placed between jaws, stabilized in the few remaining teeth.18 However, in this clinical case, the patient’s dentures were very old and lacked occlusal vertical dimension and occlusion, so their reading was not an option. Tooth assembly is still challenging, and complete dentures with balanced occlusion are difficult to achieve using digital design software.
Zirkonzhan’s facial scanner gives us a preview of the tooth exposure and the occlusal plane, and the patient can visualize that digitally.21 This preview of the try-in before printing helps save resources if the digital prediction is not what the patient desires. We consider it a valuable and easy-to-use tool.
The try-in stage is essential for checking aesthetics, occlusion, and vertical dimension. In the present case, the try-in was printed using the NextDent Try-in resin, which is available only in three colors (TI0, TI1, and TI2), and we used the TI1 (medium color). Thus, one limitation of this try-in was that the base and teeth had the same color - entirely white/yellowish, not allowing the patient to validate the tooth color or the pink aesthetic of the vestibular flange. This limitation may be one of the greatest disadvantages of this try-in method. On the other hand, it has the advantage of a more stable teeth setup once a consistent acrylic block is obtained, avoiding tooth movement or pop-up problems.18
After validation of the try-in, the final prosthesis was performed using the RP method. Most laboratories worldwide currently use the MM to produce complete dentures, whereas the RP method is mainly used for fabricating interim or try-in complete dentures and, rarely, definitive complete dentures.6,14 Milling, especially when using blocks with color gradients, has obvious dental aesthetic benefits compared to single-color printing. However, complete denture fabrication by inserting prefabricated resin artificial teeth in a milled or 3D-printed denture base and fixing them with an adhesive may lead to assembly errors, namely in the occlusion.22,23 Furthermore, some authors suggest that the adhesive may release reactive monomers.8
This clinical case shows an alternative option through superficial tooth makeup and pink acrylic application in the gum area. Superficial pigmentation can improve dental aesthetics, providing a gradation to the teeth. However, its durability is limited due to wear by chewing or prosthesis washing. In a clinical case of denture fabrications with CAD/CAM,24 the authors emphasized that appropriate staining of the teeth and denture base produces full removable dentures that ensure a good esthetic result.
Three-dimensional printing has been widely adopted for a range of biomedical applications. Compared with the conventional method, the advantages of 3D printing are a drastic reduction in the number of procedure steps and time required, high accuracy in the reconstructed dental cast, and precise reproducibility.9,10 Nevertheless, the equipment’s high initial cost and limited printed materials hinder the application of this technique. From a sustainability perspective, the MM wastes large quantities of denture base material, while 3D prototyping promises to use less denture resin.9,25
The presented protocol does not reduce the number of appointments compared to the conventional one because all clinical steps were performed using the conventional method, and only the laboratory steps were performed with a CAD/CAM technique. However, digital files allow recording and saving of all data collected from the patient. Thus, if a new denture is required, the stored data can be used to perform the milling or printing without repeating the entire process.6
Although the clinical case described is not a completely digital workflow, it can be useful for dentists and technicians. Despite its known advantages, the intraoral digital scanner has important limitations, including its high cost and not allowing a functional impression.
In conclusion, this case report shows an alternative method that involves several laboratory steps using CAD/CAM technology and an innovative way of printing dentures and circumventing some of the aesthetic limitations. Despite all the advantages, it should be highlighted that CAD/CAM protocols require extensive training.11


